Personalize Back to School with These Cricut Crafts
This is a sponsored post written by me on behalf of Cricut. All opinions are 100% mine.
This is definitely a different back to school experience for everyone, but regardless of whether you will be homeschooling, e-learning, or heading back to a traditional classroom you can still get creative and have fun with some Cricut Crafts!

Back to School Cricut Crafts
Throughout my mom’s circle of friends, I see everyone struggling to make the right decision for their family, and everyone’s situation looks different right now. Although we do all have one thing in common, we are doing the best we can with the situation we have thrust into.
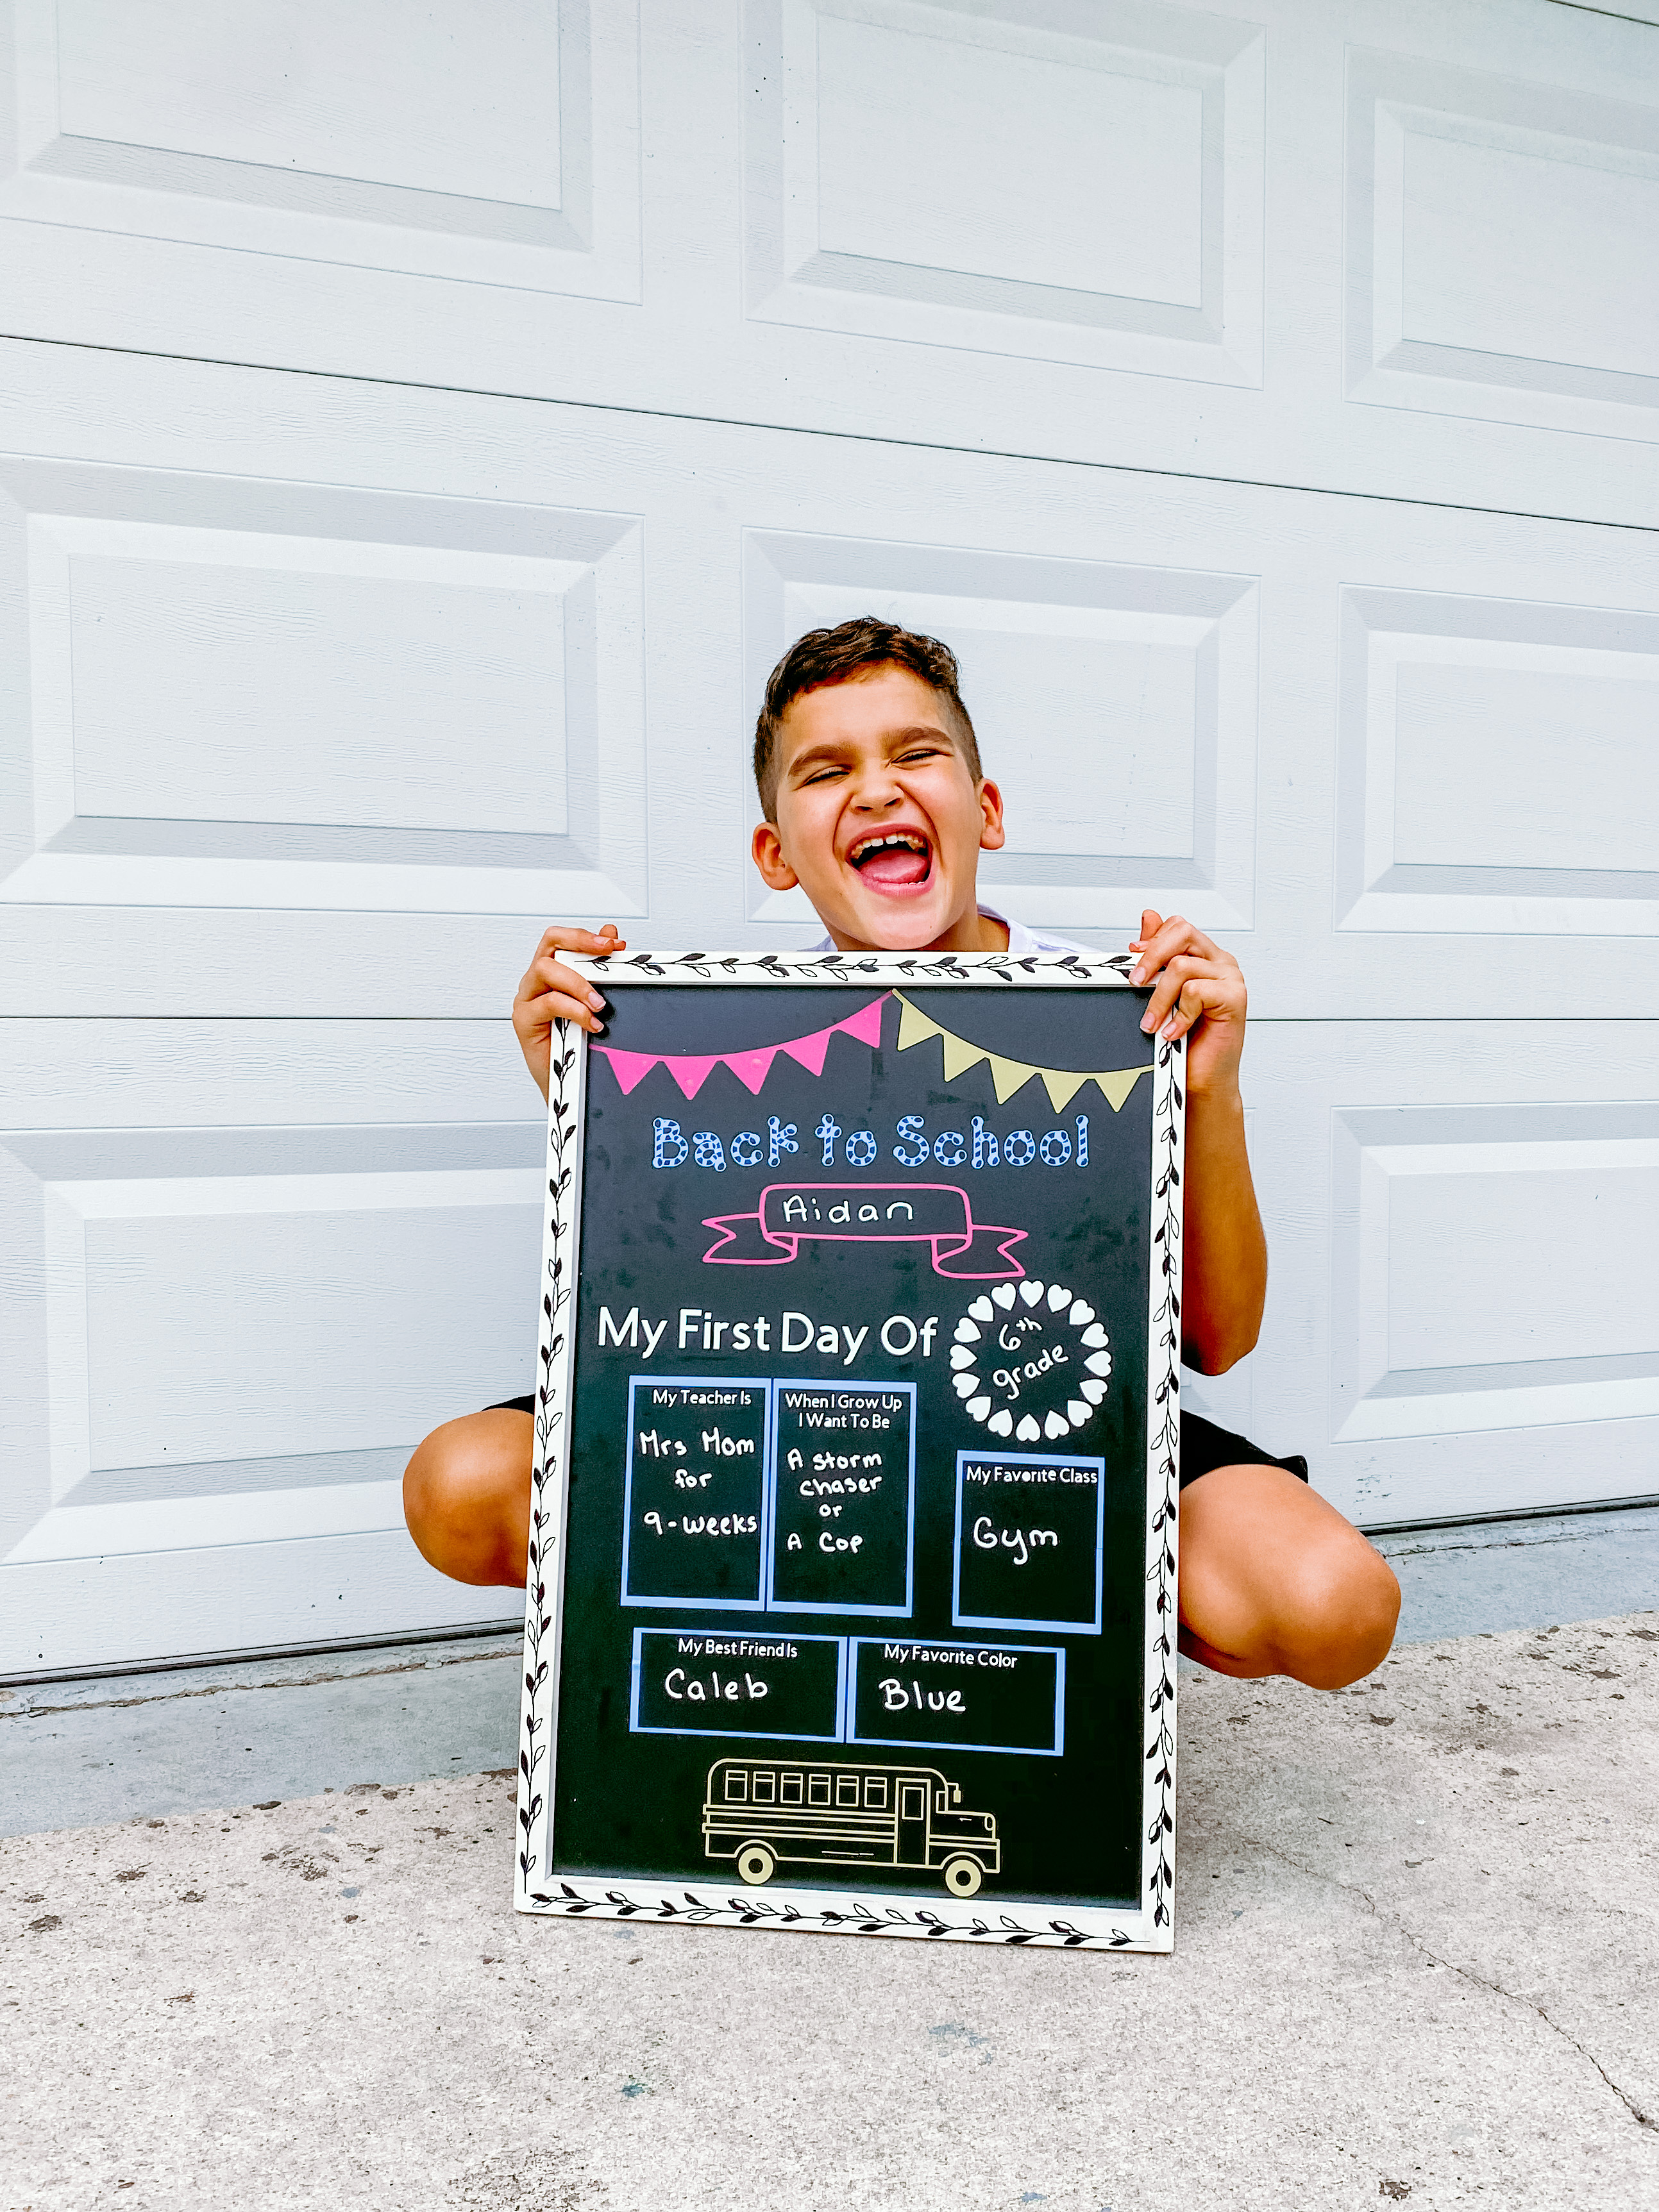
So with all the back to school stress this year, let’s take a break and allow our creativity to flow so that we can create some first day of school fun for our kids and some normalcy for ourselves. I love having an excuse to put my Cricut Explore Air 2 to work, it makes crafting beautiful projects easy. This year for the first day of school I have created a “Ready to Zoom Into 6th Grade” Cricut Infusible Ink T-Shirt because we have opted into e-learning for the first 9 weeks of school, along with a colorful DIY back to school chalkboard sign.

Back to School Sign Photo Prop
Personalized back to school signs are a quick and simple craft that will add some fun to the first day of school pictures. With Cricut Design Space your sign design options are endless! I chose banners and a school bus, using blue, yellow, pink, and white vinyl so that it would work for both the boys and my daughter.
What you need to make a chalkboard back to school sign
A small chalkboard or a piece of wood or foam and some chalkboard paint
Scissors
Cricut Vinyl
Cricut StandardGrip Machine Mat
Transfer Tape
Weeder Tool
Brayer or Scraper Tool

How to Make a First Day Of School Sign
Open up Cricut Design Space and choose what fun accents you want to add to your sign using the images section. There are lots of cute clip art designs that you can use, like an Apple, banner, or a pencil.
Next, choose your fonts, I used “DJ Inkers” for “Back to School” and “Cricut Sans” for the personalized questions, and type out each part of your sign.
The last aspect of the sign you need to decide on in design space is how you want to block out each question section. I chose a square outlines from the image section and resized them to long rectangles, there are countless shapes you can choose from or go with solid or dotted lines.
Once you have everything you want on your board designed, it is time to cut your vinyl with the Cricut Explore Air 2. Click Make It in Cricut Design Space it will tell you what colors to put on you Mat first, load the Cricut Machine, and press start.
Once you have completed cutting all your elements, use your weeding tool, and remove the extra vinyl from the backing. Then adhere the wording or design to the transfer tape and remove the backing.
Finally, apply the vinyl where you would like onto the chalkboard using a Bayer or Scraper Tool and peel the transfer tape back gently.
That’s all, everything is done quickly and cut perfectly for you. All that’s left to do is fill in the blanks with your child’s answers using chalk or a chalk marker.
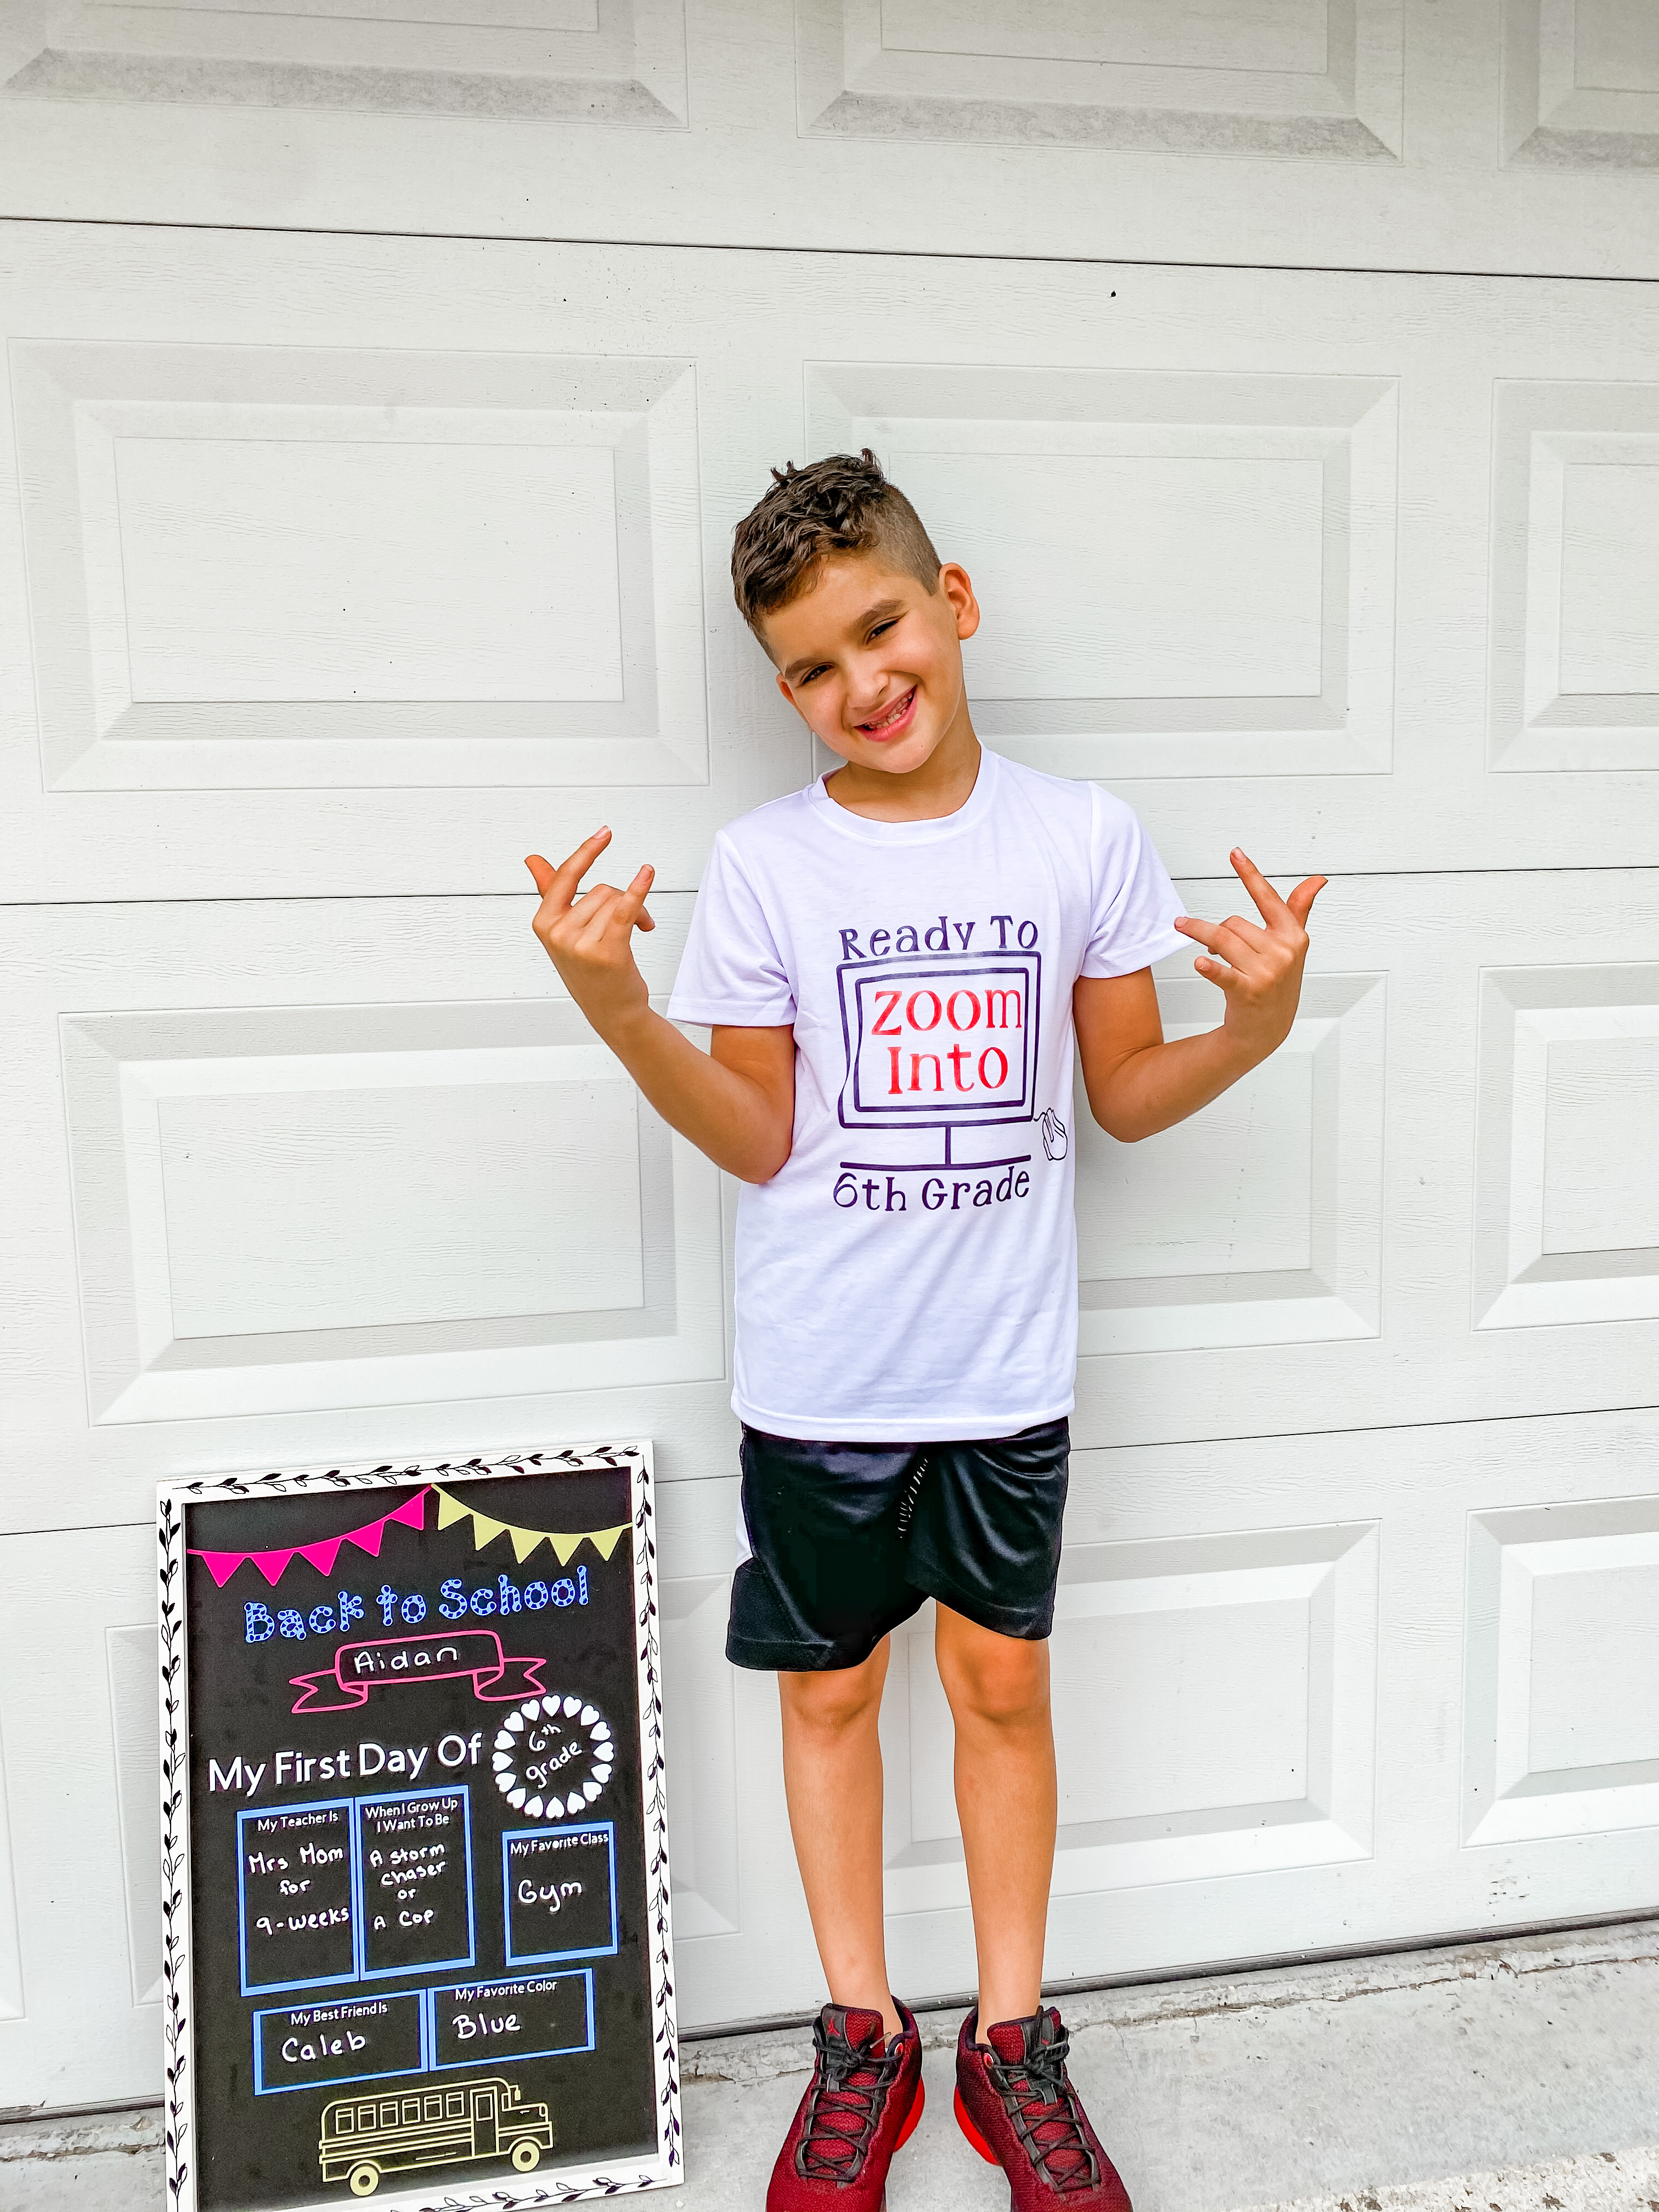
E-Learning Infusible Ink T-Shirt
Just because the kids are learning from home on the first day doesn’t mean you can’t create a fun first day of school Shirt! I am currently obsessed with Cricut Infusible Ink, I love the look of the ink on Cricut blanks and it washed great. If you remember the Cricut mermaid-themed shirt I made Lilly, I have washed that shirt dozens of times and it still looks like the day I made it!
What you need to make a personalized back to school Shirt
Cricut Machine
Cricut Infusible Ink Shirt Blank
Cricut StandardGrip Machine Mat
Cricut Infusible Ink in the colors you like
Butcher Paper
Cricut EasyPress 2

How to make an Infusible ink first day of school Shirt
Like with the back to school chalkboard, open up Cricut Design Space, and choose your designs and text. I chose a computer and mouse from the images section because my kids will be virtual learning and on the computer for most of the school day.
I also used font Cricut Sans, to write out “Ready to Zoom Into 6th Grade”, putting “Zoom Into” on the computer screen.
Once you have your design set up, click create and follow the on-screen printing instructions for loading your mat and cutting.
After your design is finished cutting, weed out the design, and then heat up your EasyPress 2. Place the shirt on the EasyPress Matt and use the Easy Press to preheat the shirt. Then place your Infusible Ink design color side down onto your shirt, cover it with paper and place your Easy Press onto the Infusible Ink Design and press start to begin the timer.
After the timer goes off, remove the EasyPress and put it back on its base. Remove the butcher paper and gently peel off the ink backing to reveal an adorable personalized shirt that looks professionally made!
Cricut Perfect First Day of School
These are just 2 quick and easy Cricut crafts that you can make to add some pizazz to the first day of school this year. With Cricut bag blanks and zipper case blanks, you could make pencil pouches, library bags, and so much more. With the Cricut EasyPress Mini, you can add fun designs to backpacks and shoes or use Cricut’s fun paper designs and make tissue boxes! There is an endless amount of Cricut craft ideas that you can make. What are you crafting this season?